Today I’m going to show you how to remove the three-speed shifter from the wheel and then show you how to completely disassemble the wheel from the bike.
So here we gonna details how to adjust your cruiser shifter to the chain.
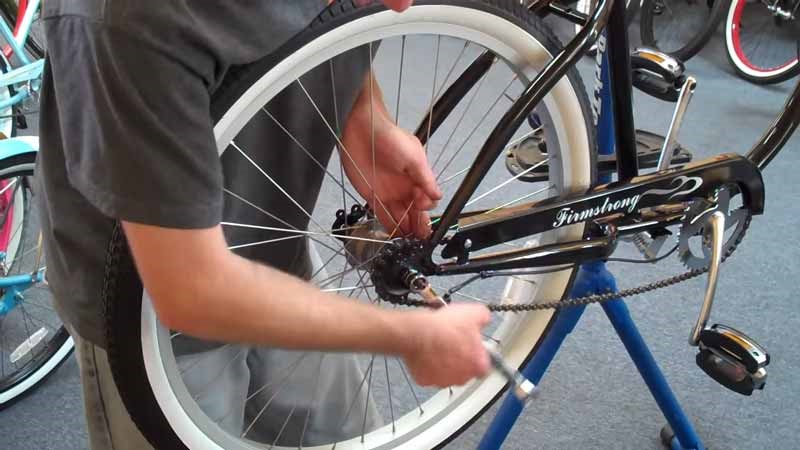
Adjust the bike change
Here’s how to tighten the chain on the best cruiser bikes for women. If your chain is getting loose, it’s on the non-chain side bike.
There’s this bar that’s connected to the frame, which is used for your breaks. If you have a coaster brake.
So, if you have this bar, you need to just loosen it up a little bit. There’s a screw-on this side and then on the backside, there’ll be a nut that you have to get with pliers.
We’re not taking it off we’re just loosening it up, making that a little loose. We’ll allow it to slide forwards and back when we adjust the wheel.
The bike frame has a channel in it that the wheel can see backward and forwards then you can do.
So, you just loosen up the nuts on both sides of the wheel to allow it to slide forward or backward. In this case, we’d slide it back to tighten up the chain.
Now, once we’ve loosened it up on the chain side, you can move the wheel forwards to make it super loose or pull it back to make it super tight.
Now, what you want to do is you don’t want it to be so tight. It doesn’t move. You want it to have a little bit of play, like maybe this much play.
So that it’s kind of hanging, but it’s still tight enough where it won’t jump off the Sprockets. If you have it too tight, it’ll wear out your chain really fast.
You might have to make a couple of attempts. So, I’ll tighten this bolt semi. Well, there’s a little bit of play.
Now, while you do this, you’ll notice that you can get your wheel crooked so that your bike is going sideways and the wheel’s rubbing against the frame If you don’t do this right.
So, after you’ve tightened up one end and gotten the chain where you want it on the chain side, you want to just move the wheel back and forth and make sure there’s an equal distance between the wheel and the frame on both sides of the wheel so that there’s clearance.
Then tighten up that nut with your wrench. Now that you believe the wheel in the chain, in the right position.
You just make sure that you’ve talked him down enough with your ranch and then do a chain check. See that there’s.
There’s a little bit of play in the chain. So, what you want to do though, is turn the wheel a little bit and then check for play again.
You can see there’s a lot of play here. So, this is the tricky part and the chain is going to wear unevenly on the Sprocket as well. So, in some places, the chain is going to be kind of loose within.
In other places, it’s going to be kind of tight. So, you have to kind of walk the line between loose and tight and make sure there’s always a little, but slack in the chain.
When you try it from different angles, you can see I’ve got a really crooked Sprocket here. So that’s probably the best I can do with this bike.
You just need to tighten up your coaster brake holder against the frame, and then you’re done go riding.
Adjust a Loosen Shifter
The first thing I need to do is loosen the shifter from the bike with that and you need a five-millimeter Allen wrench into this back screw here.
Counter-clockwise and this pops right off. There’s going to be a pin on the inside. Do not lose this pin. It’s very important. You can go ahead and take it out on the inside here.
That’s where the pin slides in. The second thing you’re gonna need to do. It’s going to be the loosen and take off the coaster brake assembly.
So just arm down here and you see a 10-millimeter nut on the back. Slide that on Phillips’s head screwdriver just comes right off.
Third and final thing You need to do a 15-millimeter wrench on these two on both axle nuts on each side.
Counter-clockwise one side is tighter and then the wheel more or less, just kind of falls off. Now to reassemble a bike, just slide the back tire, make sure the nuts are on the outside parts of the frame, this yellow washer with the teeth on it.
Make sure this is on the outside of the bike. This keeps her coaster brake in place. Slide that backs up through the grooves.
Now it is okay to hand tighten for now and we’ll do the final tightening in a little bit. What’d you want to know? Is hand-tighten the coaster brake back on.
So, when you tighten the rear wheel back on you, and does it tie in itself down to where you can’t assemble the coaster brake?
The screw goes in first, the bolt, the nut goes in the back threads bread hand-tighten all right. Now you can completely tighten down the wheel.
One important part that you want to remember is that you just need your bike wheel completely lined up in between both arms back here of the bike.
Do that tighten down one side a little bit, and you should have some markers set from where the net is kind of rubbed the paint off on the bike.
It gives you a pretty good guideline of where to flip nicely where to place the nuts again come ups and down a little bit. You got to adjust the other side more.
Now you can see that the clearance in between both arms here, perfect on both sides, you know that you’re really going to be true now to reassemble your shifter.
You want to grab your pin and then you one side, it’s going to have a flat. The other side is not going to have that same sort of lip you want to decide without the lip to go in.
The first slide that through the hollow opening, grab the shifter. This will slide right over the top. And then going over the top, it’ll fit over the nut.
Take your five-millimeter Allen. Right back into that same screw used to loosen it clockwise. There you go and you have taken off the wheel, put it back on.
Conclusion
If you need to know more topics about biking tips and tricks you can go OutdoorXsports and see our other articles. Hopefully, that blog helps you a lot.